oauth2 介绍
oauth2 协议应该是开发者们耳熟能详的协议了,这里就不做过多的介绍了,具体介绍如何在spring security中搭建oauth2的认证服务。Spring-Security-OAuth2是对OAuth2的一种实现,在spring security的官方文档中也有对如何接入oauth2有详细的说明,Spring Security Reference 接下来,我们需要对它进行学习。一般来说,OAuth2.0的服务提供方涵盖两个服务,即授权服务 (Authorization Server,也叫认证服务) 和资源服务 (Resource Server),这2个服务可以在同一个应用程序中实现,也可以分开在2个应用程序中实现。这节我们先来看看oauth2.0的认证服务如何搭建。
如何搭建
关于这个问题,大家可以先看看spring security的官方文档,再结合文档给出的demo,最后再结合度娘与谷歌进行查阅资料。
先有spring security的基础(web安全配置)
首先先搭建spring security的环境,然后再集成spring security oauth2。这里我们就简单配置一下spring security,其中有不明白的配置,可以参考前面的文章。
其中主要是 WebSecurityConfig 配置,
@Configuration
@EnableGlobalMethodSecurity(securedEnabled = true,prePostEnabled = true)
public class WebSecurityConfig extends WebSecurityConfigurerAdapter {

    // 注入密码编码器
    @Bean
    public PasswordEncoder passwordEncoder() {
        return new BCryptPasswordEncoder();
    }

    // 注入认证管理器
    @Bean
    public AuthenticationManager authenticationManagerBean() throws Exception {
        return super.authenticationManagerBean();
    }
    //安全拦截机制(最重要)
    @Override
    protected void configure(HttpSecurity http) throws Exception {
        http.csrf().disable()
                .authorizeRequests()
                .antMatchers("/r/r1").hasAnyAuthority("p1")
                .antMatchers("/login*").permitAll()
                .anyRequest().authenticated()
                .and()
                .formLogin()
        ;
    }
}
自定义一个 UserDetailsService 实现类,用于用户的认证,这里我们采用从数据库中读取用户,验证用户
@Service
public class SpringDataUserDetailsService implements UserDetailsService {

    @Autowired
    UserDao userDao;

    //根据 账号查询用户信息
    @Override
    public UserDetails loadUserByUsername(String username) throws UsernameNotFoundException {

        //将来连接数据库根据账号查询用户信息
        UserDto userDto = userDao.getUserByUsername(username);
        if(userDto == null){
            //如果用户查不到,返回null,由provider来抛出异常
            return null;
        }
        //根据用户的id查询用户的权限
        List<String> permissions = userDao.findPermissionsByUserId(userDto.getId());
        //将permissions转成数组
        String[] permissionArray = new String[permissions.size()];
        permissions.toArray(permissionArray);
        //将userDto转成json
        String principal = JSON.toJSONString(userDto);
        UserDetails userDetails = User.withUsername(principal).password(userDto.getPassword()).authorities(permissionArray).build();
        return userDetails;
    }
}
附上 UserDao 实现类,直接采用 spring framwork提供的jdbcTemplate来操作数据库,进行sql查询及结果映射。
@Repository
public class UserDao {

    @Autowired
    JdbcTemplate jdbcTemplate;

    //根据账号查询用户信息
    public UserDto getUserByUsername(String username){
        String sql = "select id,username,password,fullname,mobile from t_user where username = ?";
        //连接数据库查询用户
        List<UserDto> list = jdbcTemplate.query(sql, new Object[]{username}, new BeanPropertyRowMapper<>(UserDto.class));
        if(list !=null && list.size()==1){
            return list.get(0);
        }
        return null;
    }

    //根据用户id查询用户权限
    public List<String> findPermissionsByUserId(String userId){
        String sql = "SELECT * FROM t_permission WHERE id IN(\n" +
                "\n" +
                "SELECT permission_id FROM t_role_permission WHERE role_id IN(\n" +
                "  SELECT role_id FROM t_user_role WHERE user_id = ? \n" +
                ")\n" +
                ")\n";

        List<PermissionDto> list = jdbcTemplate.query(sql, new Object[]{userId}, new BeanPropertyRowMapper<>(PermissionDto.class));
        List<String> permissions = new ArrayList<>();
        list.forEach(c -> permissions.add(c.getCode()));
        return permissions;
    }
}
集成spring security oauth2
管理token令牌
我们知道oauth2主要是靠生成token来进行用户的验证,那么spring security oauth2生成的token是存在哪里呢?
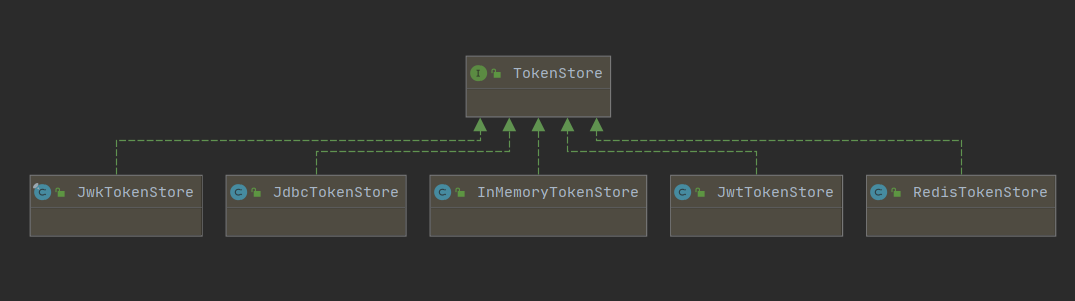
TokenStore 具体有如下好几种实现方式,可以将token通过jdbc存放在数据库中,内存中,也可以是redis中,这里我们选择放在内存中。
@Configuration
public class TokenConfig {

    @Bean
    public TokenStore tokenStore() {
        return new InMemoryTokenStore();
    }
}
在AuthorizationServer(具体后面会讲)中定义 AuthorizationServerTokenServices
@Bean
public AuthorizationServerTokenServices tokenService() {
    DefaultTokenServices service=new DefaultTokenServices();
    service.setClientDetailsService(clientDetailsService);
    service.setSupportRefreshToken(true);
    service.setTokenStore(tokenStore);
    service.setAccessTokenValiditySeconds(7200); // 令牌默认有效期2小时
    service.setRefreshTokenValiditySeconds(259200); // 刷新令牌默认有效期3天
    return service;
}
自定义一个继承 AuthorizationServerConfigurerAdapter 类的实现类 AuthorizationServer
我们来看下 AuthorizationServerConfigurerAdapter 类,发现它只是实现了 AuthorizationServerConfigurer 接口,但是接口中的几个方法还是空实现,需要我们去实现它,查看 AuthorizationServerConfigurer 接口的方法说明。
public interface AuthorizationServerConfigurer {

   /**
    * Configure the security of the Authorization Server, which means in practical terms the /oauth/token endpoint. The
    * /oauth/authorize endpoint also needs to be secure, but that is a normal user-facing endpoint and should be
    * secured the same way as the rest of your UI, so is not covered here. The default settings cover the most common
    * requirements, following recommendations from the OAuth2 spec, so you don't need to do anything here to get a
    * basic server up and running.
    *
    * @param security a fluent configurer for security features
    */
    // 设置访问授权服务的接口安全配置,特别是认证服务的/oauth/authorize,/oauth/token这两个接口,用来配置令牌端点的安全约束
   void configure(AuthorizationServerSecurityConfigurer security) throws Exception;

   /**
    * Configure the {@link ClientDetailsService}, e.g. declaring individual clients and their properties. Note that
    * password grant is not enabled (even if some clients are allowed it) unless an {@link AuthenticationManager} is
    * supplied to the {@link #configure(AuthorizationServerEndpointsConfigurer)}. At least one client, or a fully
    * formed custom {@link ClientDetailsService} must be declared or the server will not start.
    *
    * @param clients the client details configurer
    */
    // 用来配置客户端详情服务(ClientDetailsService),客户端详情信息在这里进行初始化,你能够把客户端详情信息写死在这里或者是通过数据库来存储调取详情信息。
   void configure(ClientDetailsServiceConfigurer clients) throws Exception;

   /**
    * Configure the non-security features of the Authorization Server endpoints, like token store, token
    * customizations, user approvals and grant types. You shouldn't need to do anything by default, unless you need
    * password grants, in which case you need to provide an {@link AuthenticationManager}.
    *
    * @param endpoints the endpoints configurer
    */
    // 用来配置令牌(token)的访问端点和令牌服务(token services)。
   void configure(AuthorizationServerEndpointsConfigurer endpoints) throws Exception;

}
- ClientDetailsServiceConfigurer:用来配置客户端详情服务(ClientDetailsService),客户端详情信息在
这里进行初始化,你能够把客户端详情信息写死在这里或者是通过数据库来存储调取详情信息。 - AuthorizationServerEndpointsConfigurer:用来配置令牌(token)的访问端点和令牌服务(token
services)。 - AuthorizationServerSecurityConfigurer:用来配置令牌端点的安全约束.
我们需要自定义一个类来实现这3个方法
ClientDetailsServiceConfigurer 配置客户端配置
查看 ClientDetailsService 的实现类,发现它是可以使用基于内存或者数据库来查询具体接入认证服务的client。具体的clientService有如下属性:
- clientId:(必须的)用来标识客户的Id。
- secret:(需要值得信任的客户端)客户端安全码,如果有的话。
- scope:用来限制客户端的访问范围,具体是哪些可以自行定义。
- authorizedGrantTypes:此客户端可以使用的授权类型,默认为空
- authorities:此客户端可以使用的权限(基于Spring Security authorities)。
这里我们先使用基于内存的实现来配置一个客户端,配置如下,后续可以改造成类似于验证用户那样,来基于数据库进行读取验证client.
// 用来配置客户端详情服务(ClientDetailsService),客户端详情信息在
//这里进行初始化,你能够把客户端详情信息写死在这里或者是通过数据库来存储调取详情信息
@Override
public void configure(ClientDetailsServiceConfigurer clients) throws Exception {
    // clients.withClientDetails(clientDetailsService);
    clients.inMemory()// 使用in‐memory存储
            .withClient("c1")// client_id
            .secret(new BCryptPasswordEncoder().encode("secret"))
            .resourceIds("res1")
            .authorizedGrantTypes("authorization_code",
                    "password","client_credentials","implicit","refresh_token")// 该client允许的授权类型  authorization_code,password,refresh_token,implicit,client_credentials
            .scopes("all")// 允许的授权范围
            .autoApprove(false)
            //加上验证回调地址
            .redirectUris("http://www.baidu.com");
}
AuthorizationServerEndpointsConfigurer 令牌端点配置
AuthorizationServerEndpointsConfigurer 这个对象的实例可以完成令牌服务以及令牌endpoint配置。
主要需要配置一下几个属性:
- userDetailsService: 使用自定义的UserDetailsService,验证系统用户
- authenticationManager: 认证管理器(非必填)
- authorizationCodeServices: 这个主要用于 “authorization_code” 授权码类型模式下,申请的授权码的存放方式
- tokenServices: 设置token的实现类
- allowedTokenEndpointRequestMethods: 允许访问端点的http请求方式
@Autowired
private AuthorizationCodeServices authorizationCodeServices;
@Autowired
private AuthenticationManager authenticationManager;
@Bean
public AuthorizationCodeServices authorizationCodeServices() {
    //设置授权码模式的授权码如何存取,暂时采用内存方式
    return new InMemoryAuthorizationCodeServices();
}

// 用来配置令牌(token)的访问端点和令牌服务(token
//services)。
@Override
public void configure(AuthorizationServerEndpointsConfigurer endpoints) throws Exception {
    endpoints
            .userDetailsService(springDataUserDetailsService)
            .authenticationManager(authenticationManager)
            .authorizationCodeServices(authorizationCodeServices)
            .tokenServices(tokenService())
            .allowedTokenEndpointRequestMethods(HttpMethod.POST);
}
oauth2的具体端点可以在org.springframework.security.oauth2.provider.endpoint 这个包下进行查看,包括:
- /oauth/authorize :授权端点
- /oauth/token: 获取令牌端点
- /oauth/confirm_access:用户确认授权提交端点,包括生成的默认授权页面
AuthorizationServerSecurityConfigurer 令牌端点的安全约束
AuthorizationServerSecurityConfigurer:用来配置令牌端点(Token Endpoint)的安全约束,可以限定哪些url资源可以访问我们的认证服务端点,主要有以下几个属性配置:
- tokenKeyAccess:tokenkey这个endpoint当使用JwtToken且使用非对称加密时,资源服务用于获取公钥而开放的,这里指这个
endpoint完全公开。 - checkTokenAccess:checkToken这个endpoint完全公开
- allowFormAuthenticationForClients: 允许表单认证
在 AuthorizationServer 中配置如下.
// 用来配置令牌端点的安全约束
@Override
public void configure(AuthorizationServerSecurityConfigurer security) throws Exception {
    security
            // tokenkey这个endpoint当使用JwtToken且使用非对称加密时,资源服务用于获取公钥而开放的,这里指这个endpoint完全公开
            .tokenKeyAccess("permitAll()")
            // checkToken这个endpoint完全公开
            .checkTokenAccess("permitAll()")
            // 允许表单认证
            .allowFormAuthenticationForClients();
}
到这里认证服务主要的基本配置就介绍完了,希望大家有一点收获。后续会继续写资源服务,结合网关如何继承等文章。最后再附上本文的demo代码源码供参考:GitHub - githubtwo/distributed-sercurity: distributed-sercurity-oauth2