自Spring 3.1起,提供了类似于@Transactional注解事务的注解Cache支持,且提供了Cache抽象,在此之前一般通过AOP实现。通过 Spring Cache 可以很方便的管理我们的缓存。
使用Spring Cache的好处:
- 提供基本的Cache抽象,方便切换各种底层Cache;
- 通过注解Cache可以实现类似于事务一样,缓存逻辑透明的应用到我们的业务代码上,且只需要更少的代码就可以完成;
- 提供事务回滚时也自动回滚缓存;
- 支持比较复杂的缓存逻辑;
内存缓存 Redis 由于它支持多数据结构以及其它特性,所以我们通常会使用 Redis 做为我们的缓存。 并且 Spring 提供了 Spring Data Redis 来进行 Redis 的 Cache 管理。下面我们就先以 Spring Data Redis 1.x 提供一个简单的 Demo 来示例一下如何与 Spring Boot Cache 集成 。
1、Spring Data Redis 1.x
1.1 pom.xml
以下是项目需要依赖的 Jar 包,主要是 web 环境以及 spring-data-redis 的依赖。
<?xml version="1.0" encoding="UTF-8"?>

<project xmlns="http://maven.apache.org/POM/4.0.0" xmlns:xsi="http://www.w3.org/2001/XMLSchema-instance"
         xsi:schemaLocation="http://maven.apache.org/POM/4.0.0 http://maven.apache.org/xsd/maven-4.0.0.xsd">
    <modelVersion>4.0.0</modelVersion>

    <groupId>org.example</groupId>
    <artifactId>spring-cache-demo</artifactId>
    <version>1.0-SNAPSHOT</version>

    <name>spring-cache-demo</name>

    <parent>
        <groupId>org.springframework.boot</groupId>
        <artifactId>spring-boot-starter-parent</artifactId>
        <version>1.5.6.RELEASE</version>
        <relativePath/>
    </parent>

    <properties>
        <project.build.sourceEncoding>UTF-8</project.build.sourceEncoding>
        <maven.compiler.source>1.8</maven.compiler.source>
        <maven.compiler.target>1.8</maven.compiler.target>
        <spring.boot.version>1.5.6.RELEASE</spring.boot.version>
    </properties>

    <dependencies>
        <dependency>
            <groupId>org.springframework.boot</groupId>
            <artifactId>spring-boot-starter-web</artifactId>
            <version>${spring.boot.version}</version>
        </dependency>
        <dependency>
            <groupId>org.springframework.boot</groupId>
            <artifactId>spring-boot-starter-data-redis</artifactId>
            <version>${spring.boot.version}</version>
        </dependency>
        <dependency>
            <groupId>org.projectlombok</groupId>
            <artifactId>lombok</artifactId>
        </dependency>
    </dependencies>

</project>
1.2 RedisConfig.java
RedisConfig.java 主要配置 Redis 操作模板类 RestTemplate ,Spring cache 管理类 CacheManager 。
@Configuration
@EnableCaching
public class RedisConfig {

    @Bean(name = "redisConnectionFactory")
    public RedisConnectionFactory redisConnectionFactory() {
        JedisPoolConfig poolConfig = new JedisPoolConfig();
        poolConfig.setMinIdle(20);
        poolConfig.setMaxIdle(100);
        poolConfig.setMaxTotal(1000);
        poolConfig.setMaxWaitMillis(2000);
        poolConfig.setTestOnBorrow(true);
        JedisConnectionFactory factory = new JedisConnectionFactory(poolConfig);
        factory.setUsePool(true);
        factory.setConvertPipelineAndTxResults(true);
        factory.afterPropertiesSet();
        return factory;
    }

    @Bean(name = "redisTemplate")
    public StringRedisTemplate cacheRedisTemplate(RedisConnectionFactory redisConnectionFactory) {
        StringRedisTemplate template = new StringRedisTemplate();
        StringRedisSerializer keyRedisSerializer = new StringRedisSerializer();
        GenericJackson2JsonRedisSerializer valueRedisSerializer = new GenericJackson2JsonRedisSerializer();
        template.setEnableTransactionSupport(true);
        template.setKeySerializer(keyRedisSerializer);
        template.setHashKeySerializer(keyRedisSerializer);
        template.setValueSerializer(valueRedisSerializer);
        template.setHashValueSerializer(valueRedisSerializer);
        template.setDefaultSerializer(keyRedisSerializer);
        template.setConnectionFactory(redisConnectionFactory);
        return template;
    }

    @Bean(name = "cacheManage")
    public CacheManager cacheManager(@Qualifier("redisTemplate") StringRedisTemplate redisTemplate){
        List<String> cacheNames = new ArrayList<>();
        cacheNames.add("user");
        RedisCacheManager cacheManager = new RedisCacheManager(redisTemplate, cacheNames);
        cacheManager.setUsePrefix(true);
        return cacheManager;
    }

}
由于 Spring Data 1.x 中的 CacheManager 实现 RedisCacheManager 管理对象的序列化与反序列化都是一个所以在配置值序列化的时候是使用的类 GenericJackson2JsonRedisSerializer 。当然也可以把值序列化进行如下配置:
Jackson2JsonRedisSerializer valueRedisSerializer = new Jackson2JsonRedisSerializer(Object.class);
//解决查询缓存转换异常的问题
ObjectMapper objectMapper = new ObjectMapper();
objectMapper.setVisibility(PropertyAccessor.ALL, JsonAutoDetect.Visibility.ANY);
objectMapper.enableDefaultTyping(ObjectMapper.DefaultTyping.NON_FINAL);
objectMapper.configure(DeserializationFeature.FAIL_ON_UNKNOWN_PROPERTIES, false);
valueRedisSerializer.setObjectMapper(objectMapper);
但是这种情况存在问题,等下我们看一下 Redis 中的缓存就知道了。
1.3 User.java
用户实体类,用于后面的测试。
@Data
public class User {

    private String id;
    private String name;
    private Integer age;
    private Date birthday;

}
1.4 UserService.java
定义一个用户服务,主要的功能就是通过用户 ID 查询用户
public interface UserService {

    User getUser(String userId);

}
1.5 UserServiceImpl.java
用户服务实现类,因为我们的重点是缓存的处理,所以这里就是简化操作直接创建对象实例而不是去数据查询。
@Service("userService")
public class UserServiceImpl implements UserService {

    @Override
    @Cacheable(cacheNames = {"user"}, key = "#userId")
    public User getUser(String userId) {
        User user = new User();
        user.setId(userId);
        user.setName("carl");
        user.setAge(30);
        user.setBirthday(new Date());
        return user;
    }
}
1.6 UserController.java
用户 Controller 根据用户 ID 查询用户信息。
@RestController
@RequestMapping("user")
public class UserController {

    @Resource
    private UserService userService;

    @RequestMapping("get")
    public User test(@RequestParam String id) {
        User user = userService.getUser(id);
        return user;
    }

}
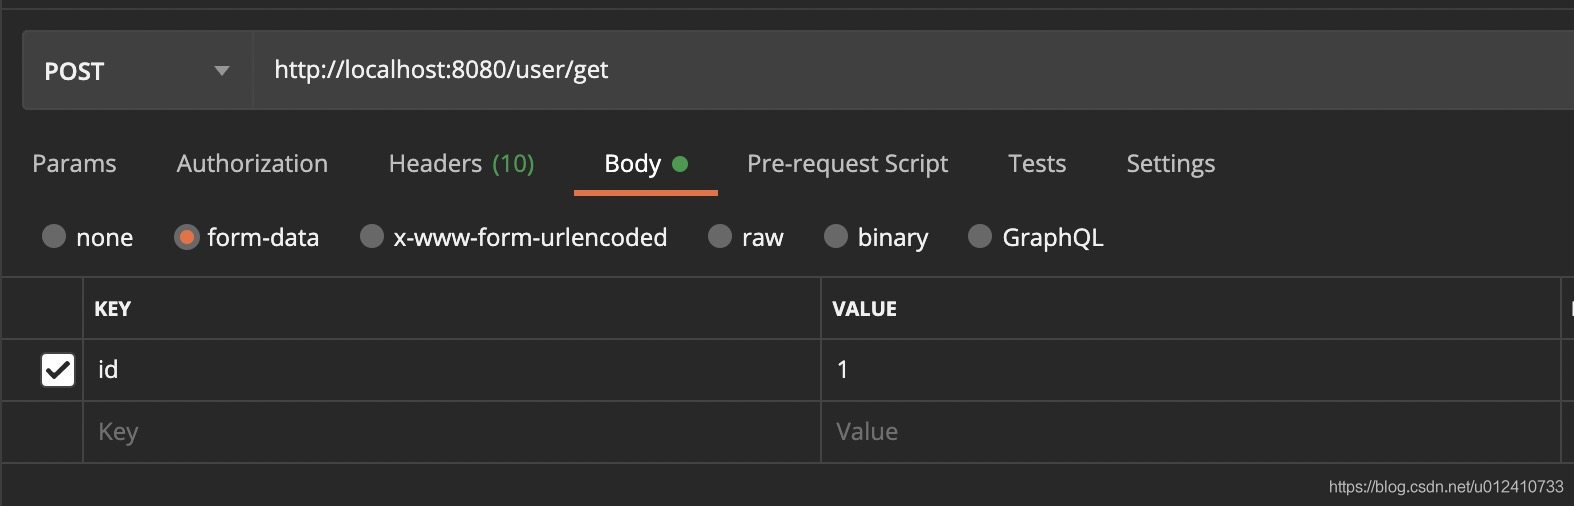
然后使用 postman 请求 http://localhost:8080/user/get ,如下图所示:

就可以在 Redis 中看到缓存的值:
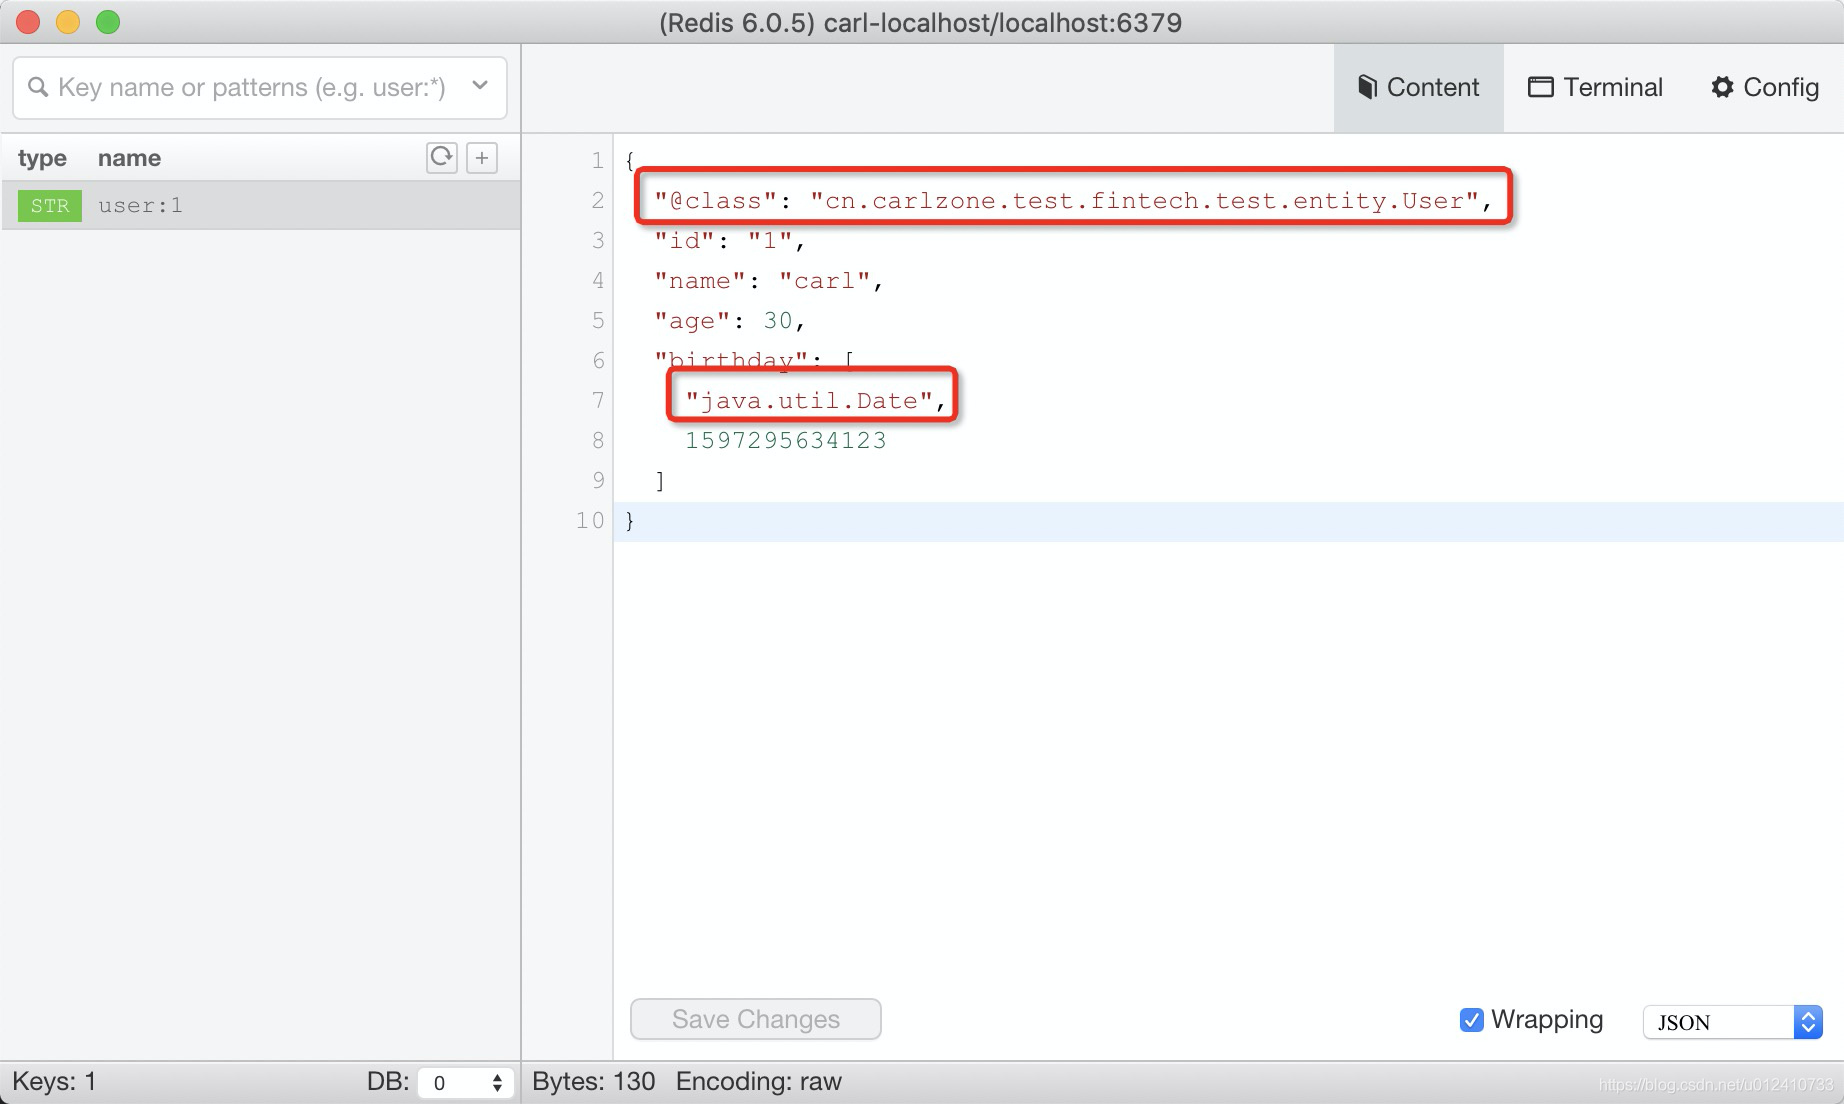
从我们之前的配置以及缓存里面都可以看到,因为 Spring Data Redis 1.x 里面 CacheManager 对象缓存的管理都是统一的,所以只能使用统一的 JSON 序列化对象
GenericJackson2JsonRedisSerializer 。而且必须在序列化的 JSON 字段串对象里面保存序列化前的对象信息才能进行反序列化。那么这些序列化对象里面的对象的类信息是否可以去掉呢?答案是可以的,使用 Spring Data Redis 2.x 。 它对各个缓存的序列化/反序列化都是分开管理的 。
2、Spring Data Redis 2.x
以下是项目需要依赖的 Jar 包,主要是把 Spring Boot 的版本和 Spring-Data-Redis 的版本都升级到 2.x 版本。
2.1 pom.xml
<?xml version="1.0" encoding="UTF-8"?>

<project xmlns="http://maven.apache.org/POM/4.0.0" xmlns:xsi="http://www.w3.org/2001/XMLSchema-instance"
         xsi:schemaLocation="http://maven.apache.org/POM/4.0.0 http://maven.apache.org/xsd/maven-4.0.0.xsd">
    <modelVersion>4.0.0</modelVersion>

    <groupId>org.example</groupId>
    <artifactId>spring-cache-demo</artifactId>
    <version>1.0-SNAPSHOT</version>

    <name>spring-cache-demo</name>

    <parent>
        <groupId>org.springframework.boot</groupId>
        <artifactId>spring-boot-starter-parent</artifactId>
        <version>2.1.4.RELEASE</version>
        <relativePath/>
    </parent>

    <properties>
        <project.build.sourceEncoding>UTF-8</project.build.sourceEncoding>
        <maven.compiler.source>1.8</maven.compiler.source>
        <maven.compiler.target>1.8</maven.compiler.target>
        <spring.boot.version>2.1.4.RELEASE</spring.boot.version>
    </properties>

    <dependencies>
        <dependency>
            <groupId>org.springframework.boot</groupId>
            <artifactId>spring-boot-starter-web</artifactId>
            <version>${spring.boot.version}</version>
        </dependency>
        <dependency>
            <groupId>org.springframework.boot</groupId>
            <artifactId>spring-boot-starter-data-redis</artifactId>
            <version>${spring.boot.version}</version>
        </dependency>
        <dependency>
            <groupId>redis.clients</groupId>
            <artifactId>jedis</artifactId>
        </dependency>
        <dependency>
            <groupId>org.projectlombok</groupId>
            <artifactId>lombok</artifactId>
        </dependency>
    </dependencies>

</project>
2.2 redis 缓存管理配置类
public class RedisCacheConfiguration extends CachingConfigurerSupport {

    @Override
    public CacheManager cacheManager() {
        JedisPoolConfig poolConfig = new JedisPoolConfig();
        poolConfig.setMinIdle(20);
        poolConfig.setMaxIdle(100);
        poolConfig.setMaxTotal(1000);
        poolConfig.setMaxWaitMillis(5000);
        poolConfig.setTestOnBorrow(true);
        JedisConnectionFactory factory = new JedisConnectionFactory(poolConfig);
        // 根据redis缓存配置和reid连接工厂生成redis缓存管理器
        Map<String, RedisCacheConfiguration> cacheConfigurations = initialCacheConfigurations();
        RedisCacheConfiguration defaultCacheConfiguration = defaultCacheConfiguration();
        RedisCacheManager redisCacheManager = RedisCacheManager.builder(factory)
                .cacheDefaults(RedisCacheConfiguration.defaultCacheConfig())
                .transactionAware()
                .withInitialCacheConfigurations(cacheConfigurations)
                .build();
        return redisCacheManager;
    }

    public RedisCacheConfiguration buildCacheConfiguration(Duration timeToLive, Class clazz){
        // redis缓存配置
        RedisCacheConfiguration config = RedisCacheConfiguration.defaultCacheConfig()
                .entryTtl(timeToLive)
                .serializeKeysWith(RedisSerializationContext.SerializationPair.fromSerializer(keySerializer()))
                .serializeValuesWith(RedisSerializationContext.SerializationPair.fromSerializer(valueSerializer(clazz)))
                .disableCachingNullValues();
        return config;
    }

    protected Map<String, RedisCacheConfiguration> initialCacheConfigurations() {
        Map<String, RedisCacheConfiguration> result = new HashMap<>(16);
        result.put("user", buildCacheConfiguration(Duration.ofSeconds(60 * 60), User.class));
        return result;
    }

    /**
     * redis 键序列化使用 StringRedisSerializer
     * @return
     */
    private RedisSerializer<String> keySerializer() {
        return new StringRedisSerializer();
    }

    /**
     * redis 值序列化使用 json 序列化器
     * @return
     */
    private  RedisSerializer valueSerializer(Class clazz) {
        return new Jackson2JsonRedisSerializer(clazz);
    }

}
在 Spring Data Redis 2.x 中每个缓存都会有一个 RedisCacheConfiguration 对应一个序列化/反序列化对象。并且会以 cacheNames + "::" + key ,也就是说如果查询用户 ID 为 1 的用户,会以 key 为 user::1 ,值为 User 对象的 JSON 格式体来保存。
然后启动 Spring Boot 项目然后通过 Postman 访问 http:localhost:8080/user/get .
就可以在 Redis 中看到缓存的值:

可以看到在 Redis 中现在需要保存的值是没有对象类型的。
3、其它优化点
从上面的点我们可以看到在使用 Spring Cache 的时候都是需要在 @Cacheable 中添加 cacheNames 这个属性。有可能有些开发忘记定义这个属性,我们需要兼容这个点。
3.1 优化版本一
跟踪源代码我们可以发现 Spring Cache 在获取 CacheName 的时候使用的是 CacheResolver 接口的实现 org.springframework.cache.interceptor.SimpleCacheResolver 如果在注解里面定义的 cacheNames 为空就会报错。我们可以继承这个类,然后优化它如果定义的 cacheNames 为空,我们就返回一个默认值 default 。
SmartCacheResolver.java
public class SmartCacheResolver extends SimpleCacheResolver {

    @Override
    protected Collection<String> getCacheNames(CacheOperationInvocationContext<?> context) {
        Collection<String> cacheNames = super.getCacheNames(context);
        if(CollectionUtils.isEmpty(cacheNames)){
            return Collections.singleton("default");
        }
        return context.getOperation().getCacheNames();
    }

}
然后配置文件更变为:
RedisCacheConfig.java
@Configuration
@EnableCaching
public class RedisConfig extends CachingConfigurerSupport {

    @Override
    public CacheManager cacheManager() {
        JedisPoolConfig poolConfig = new JedisPoolConfig();
        poolConfig.setMinIdle(20);
        poolConfig.setMaxIdle(100);
        poolConfig.setMaxTotal(1000);
        poolConfig.setMaxWaitMillis(5000);
        poolConfig.setTestOnBorrow(true);
        JedisConnectionFactory factory = new JedisConnectionFactory(poolConfig);
        // 根据redis缓存配置和reid连接工厂生成redis缓存管理器
        Map<String, RedisCacheConfiguration> cacheConfigurations = initialCacheConfigurations();
//        RedisCacheConfiguration defaultCacheConfiguration = defaultCacheConfiguration();
        RedisCacheManager redisCacheManager = RedisCacheManager.builder(factory)
                .cacheDefaults(RedisCacheConfiguration.defaultCacheConfig())
                .transactionAware()
                .withInitialCacheConfigurations(cacheConfigurations)
                .build();
        // 必须手动调用,不然就使用默认的 Cache Config
        redisCacheManager.afterPropertiesSet();
        return redisCacheManager;
    }

    @Override
    public CacheResolver cacheResolver() {
        SmartCacheResolver cacheResolver = new SmartCacheResolver();
        cacheResolver.setCacheManager(cacheManager());
        return cacheResolver;
    }

    private Map<String, RedisCacheConfiguration> initialCacheConfigurations() {
        Map<String, RedisCacheConfiguration> result = new HashMap<>(16);
        result.put("user", buildCacheConfiguration(Duration.ofSeconds(60 * 60), User.class));
        return result;
    }

    private RedisCacheConfiguration buildCacheConfiguration(Duration timeToLive, Class clazz){
        // redis缓存配置
        RedisCacheConfiguration config = RedisCacheConfiguration.defaultCacheConfig()
                .entryTtl(timeToLive)
                .serializeKeysWith(RedisSerializationContext.SerializationPair.fromSerializer(keySerializer()))
                .serializeValuesWith(RedisSerializationContext.SerializationPair.fromSerializer(valueSerializer(clazz)))
                .disableCachingNullValues();
        return config;
    }

    /**
     * redis 键序列化使用 StringRedisSerializer
     * @return
     */
    private RedisSerializer<String> keySerializer() {
        return new StringRedisSerializer();
    }

    /**
     * redis 值序列化使用 json 序列化器
     * @return
     */
    private  RedisSerializer valueSerializer(Class clazz) {
        return new Jackson2JsonRedisSerializer(clazz);
    }

}
@Data
public class Book {

    private String id;

    private String bookName;

}

// Book 服务
public interface BookService {

    Book getBook(String id);

}

// Book 服务实现类,未指定 cacheNames
@Service(value = "bookService")
public class BookServiceImpl implements BookService {

    @Override
    @Cacheable(key = "#id")
    public Book getBook(String id) {
        Book book = new Book();
        book.setId(id);
        book.setBookName("活着");
        return book;
    }

}

// Controller 用于测试
@RestController
@RequestMapping("book")
public class BookController {

    @Resource(name = "bookService")
    private BookService bookService;

    @RequestMapping("get")
    public Book get(String id){
        return bookService.getBook(id);
    }

}
然后通过 Posman 访问: http://localhost:8080/book/get 参数为 1,会报以下错误:
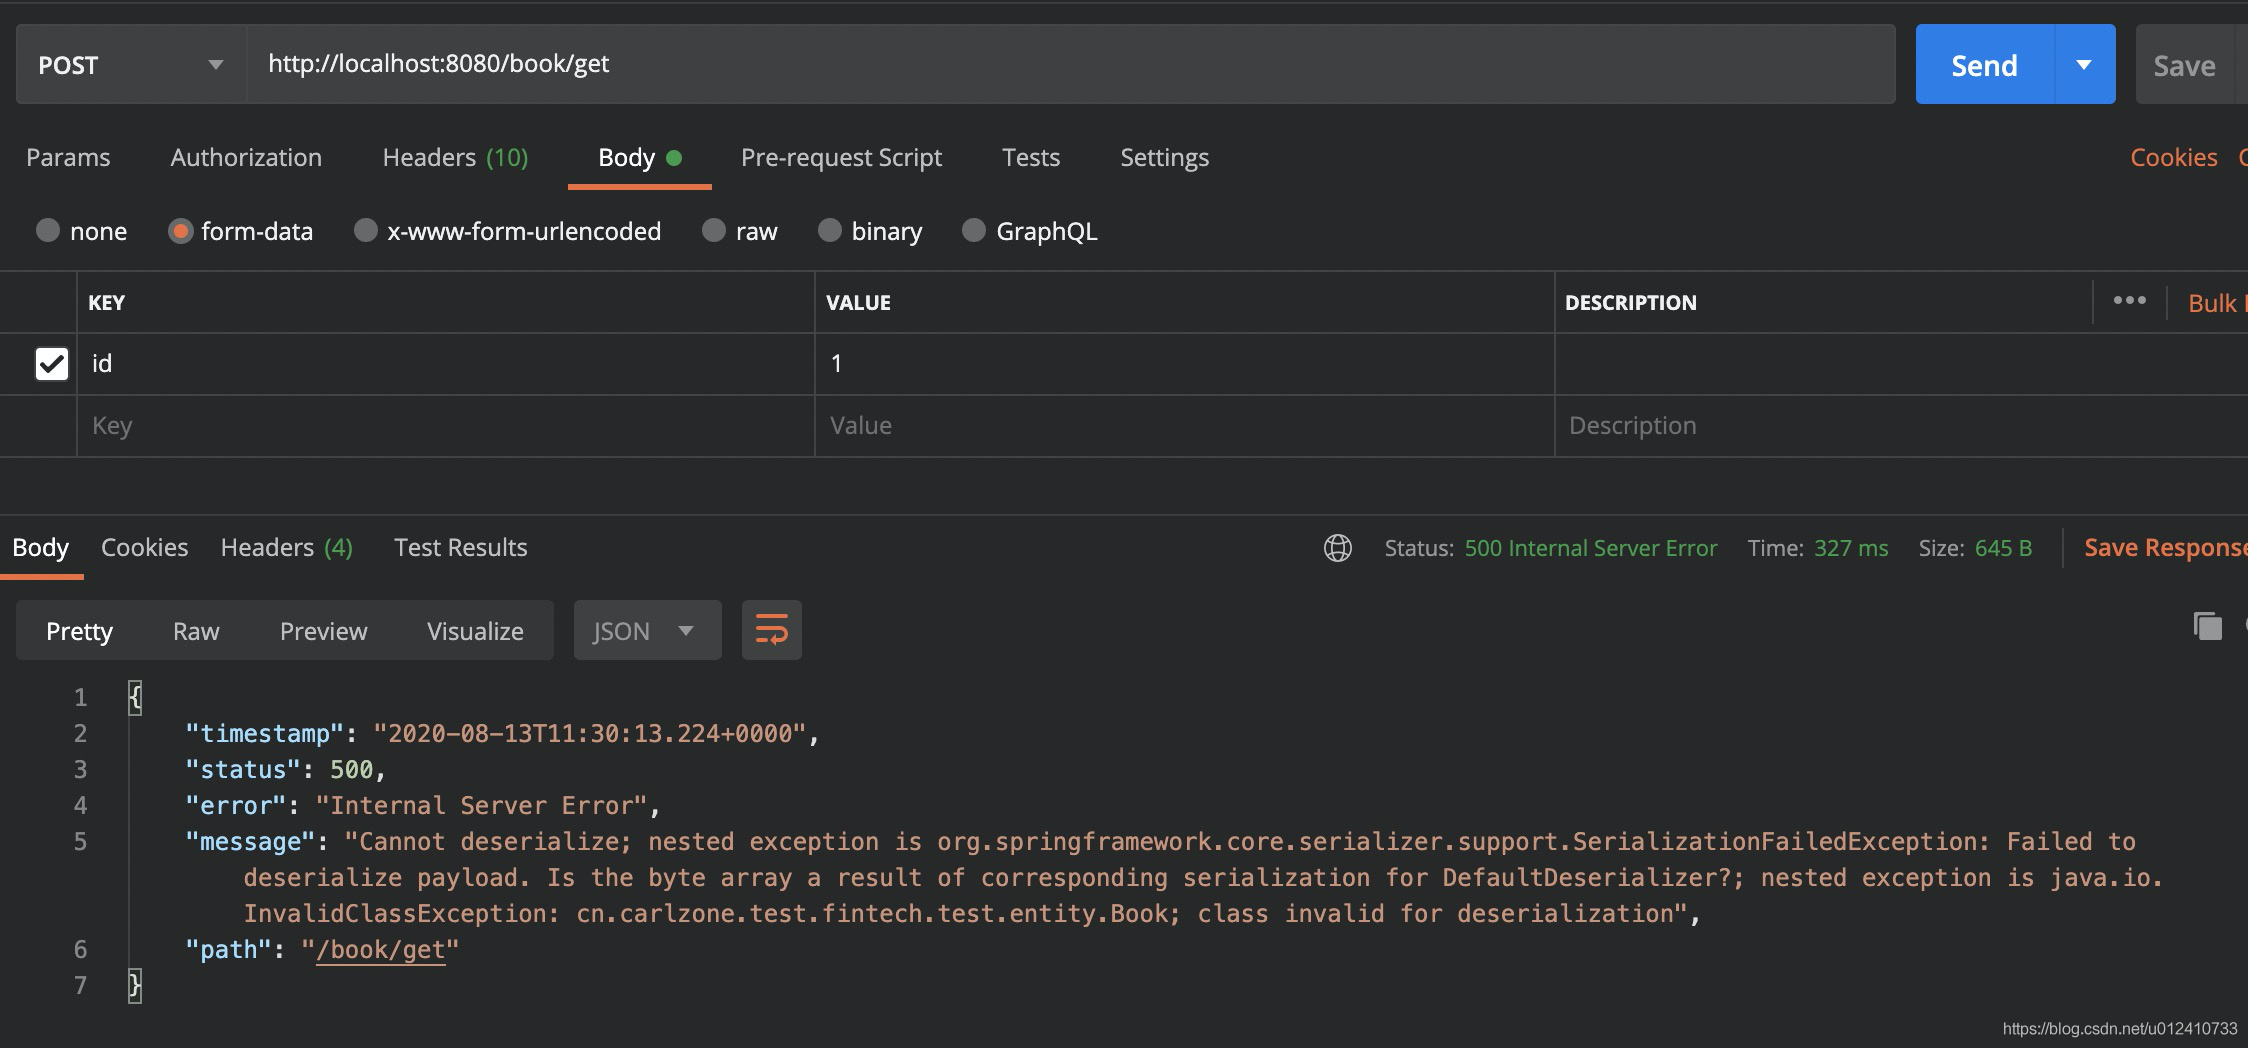
因为 Spring Cache 的配置 Redis 序列化使用的是 JDK 的序列化/反序列化方式,所以只需要 Book 类实现
Serializable 就可以了。
3.2 优化版本二
上面需要实现 JDK 的序列化标识接口 Serializable,为了对使用者更加方便,我们就使用 Spring Data Redis 1.x 的,可以添加任意对象。只需要在序列化对象的时候包含对象信息。
RedisCacheConfig.java
@Configuration
@EnableCaching
public class RedisConfig extends CachingConfigurerSupport {

    @Override
    public CacheManager cacheManager() {
        JedisPoolConfig poolConfig = new JedisPoolConfig();
        poolConfig.setMinIdle(20);
        poolConfig.setMaxIdle(100);
        poolConfig.setMaxTotal(1000);
        poolConfig.setMaxWaitMillis(5000);
        poolConfig.setTestOnBorrow(true);
        JedisConnectionFactory factory = new JedisConnectionFactory(poolConfig);
        // 根据redis缓存配置和reid连接工厂生成redis缓存管理器
        Map<String, RedisCacheConfiguration> cacheConfigurations = initialCacheConfigurations();
        RedisCacheManager redisCacheManager = RedisCacheManager.builder(factory)
                .cacheDefaults(defaultCacheConfiguration())
                .transactionAware()
                .withInitialCacheConfigurations(cacheConfigurations)
                .build();
        // 必须手动调用,不然就使用默认的 Cache Config
        redisCacheManager.afterPropertiesSet();
        return redisCacheManager;
    }

    @Override
    public CacheResolver cacheResolver() {
        SmartCacheResolver cacheResolver = new SmartCacheResolver();
        cacheResolver.setCacheManager(cacheManager());
        return cacheResolver;
    }

    private Map<String, RedisCacheConfiguration> initialCacheConfigurations() {
        Map<String, RedisCacheConfiguration> result = new HashMap<>(16);
        result.put("user", buildCacheConfiguration(Duration.ofSeconds(60 * 60), User.class));
        return result;
    }

    private RedisCacheConfiguration defaultCacheConfiguration() {
        return buildCacheConfiguration(Duration.ofSeconds(60 * 60), null);
    }

    private RedisCacheConfiguration buildCacheConfiguration(Duration timeToLive, Class clazz){
        // redis缓存配置
        RedisCacheConfiguration config = RedisCacheConfiguration.defaultCacheConfig()
                .entryTtl(timeToLive)
                .serializeKeysWith(RedisSerializationContext.SerializationPair.fromSerializer(keySerializer()))
                .serializeValuesWith(RedisSerializationContext.SerializationPair.fromSerializer(valueSerializer(clazz)))
                .disableCachingNullValues();
        return config;
    }

    /**
     * redis 键序列化使用 StringRedisSerializer
     * @return
     */
    private RedisSerializer<String> keySerializer() {
        return new StringRedisSerializer();
    }

    /**
     * redis 值序列化使用 json 序列化器
     * @return
     */
    private  RedisSerializer valueSerializer(Class clazz) {
        if(clazz == null) {
            return new GenericJackson2JsonRedisSerializer();
        }
        return new Jackson2JsonRedisSerializer(clazz);
    }

}
然后对于 Book 这个对象并没有添加相应的 RedisCacheConfiguration ,它会使用我们上面默认的配置:

总体来说, Spring Data Redis 2.x 进行缓存管理可以根据对象定制化序列化方式,而 Spring Data Redis 1.x 进行缓存管理的时候所有对象只能使用一个序列化方式。并且 Spring Data Redis 2.x 版本最好使用 Spring Boot 2.x。
原文:Spring Boot Cache 集成 Spring Data Redis 1.x 与 2.x 的差异_spring-data-redis 1.x-CSDN博客
作者: carl-zhao